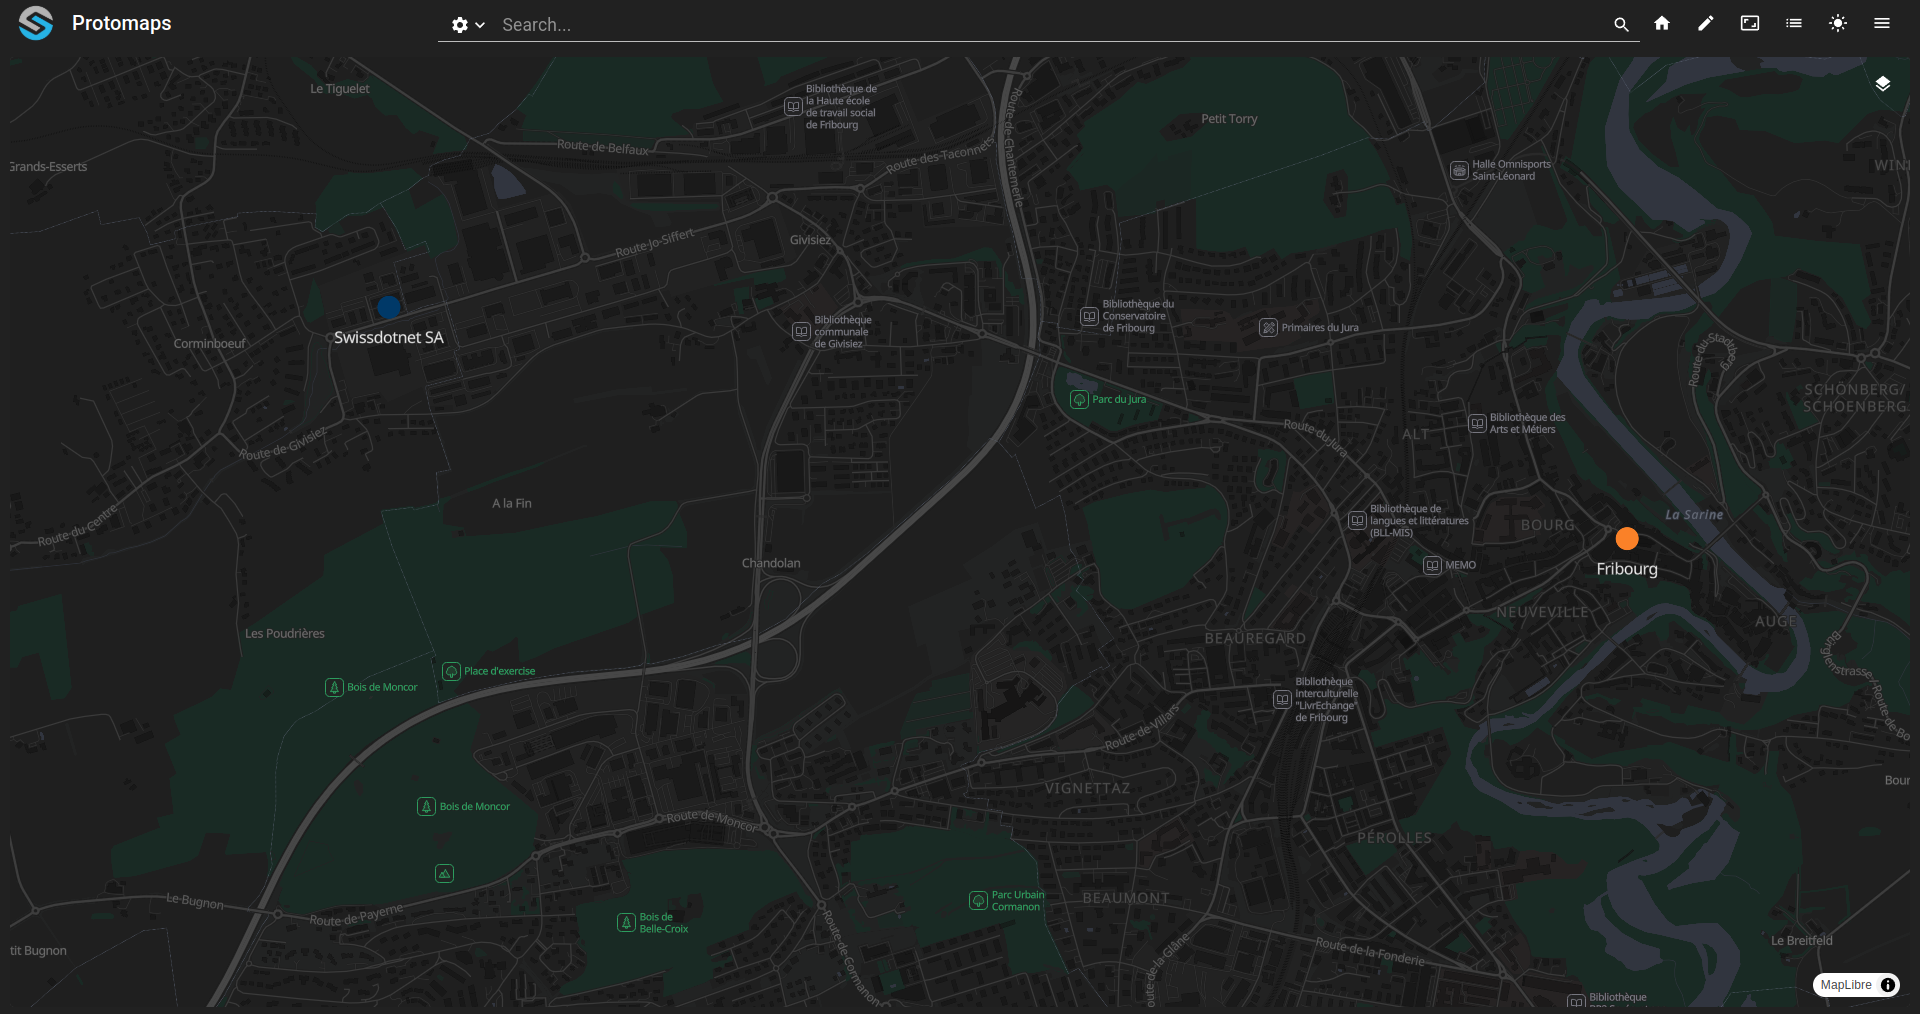
Offline map display standard points on map
This example shows how to display standard geographic points on an offline map using a locally hosted Protomap (PMTiles) file.
Extract a PMTiles file from an existing Protomaps source using the
pmtilesCLI with a bounding box.Declare the PMTiles asset as a
module.resourcesfile and reference it viaprotomapSourcein the dashboard.Restrict user navigation to the offline map area using
maxBoundsandminZoomparameters.Configure geographic points with
geo.mapsandowner.variables, then display them via a layer.
git checkout origin/osp-maps-configuration .
git checkout origin/osp-web-configuration .
git checkout origin/osp-variables-configuration .
git checkout origin/example-maps-offline-display-standard .
Learning goals
Description
The Maps module lets users display GeoJSON support data on a map. Static geographic elements are usually declared inside geo.maps files. Once a geometry is declared, every value below it in the configuration tree inherits it until another geo.maps file is found. Collection-backed and alarm-backed layers can also stream GeoJSON directly instead of inheriting it from geo.maps. To expose a layer, you typically declare three files:
layer.weblayer.mapslayer.ospp
The layer.ospp file is the main one for the examples in this section. It declares the layer type, the value type, and the mapSources used to populate it.
Configuration structure
![@startuml
skinparam backgroundColor transparent
package "modules" as modules {
node ospweb as "osp-web"
node ospmaps as "osp-maps"
}
package "root" as root {
package "assets" as assets {
[CH-fr-Fribourg.pmtiles] as pmtiles
}
package "dashboard" as mapDashboard {
[dashboard.view] as ddv
[dashboard.web] as ddw
}
package "layers" as mapLayers {
[layer.ospp] as layerospp
[layer.maps]
[layer.web]
}
package "points" as p {
package "cathedral" as pc {
[geo.maps] as pcm
[owner.variables] as pcv
[value.ospp] as pco
}
package "office" as oc {
[geo.maps] as ocm
[owner.variables] as ocv
[value.ospp] as oco
}
}
}
ospweb -[#black]-> mapDashboard : **Own**
ospweb -[#black]-> assets : **Own**
ospmaps -[#black]-> pcm : **Own**
ospmaps -[#black]-> ocm : **Own**
ddv -[#black]-> assets : **Loads**
pcm -[#black]-> pco: **linked**
ocm -[#black]-> oco: **linked**
layerospp -[#black]u-> pco : **Configured to be displayed**
layerospp -[#black]u-> oco : **Configured to be displayed**
@enduml](../_images/plantuml-e0a6aaed8758817301c468a22f16590d81da32d9.png)
Steps
0. Install Protomap CLI
Download the pmtiles CLI to extract map from existing sources. This tool is used to create the Protomap for the next step.
1. Create Protomap
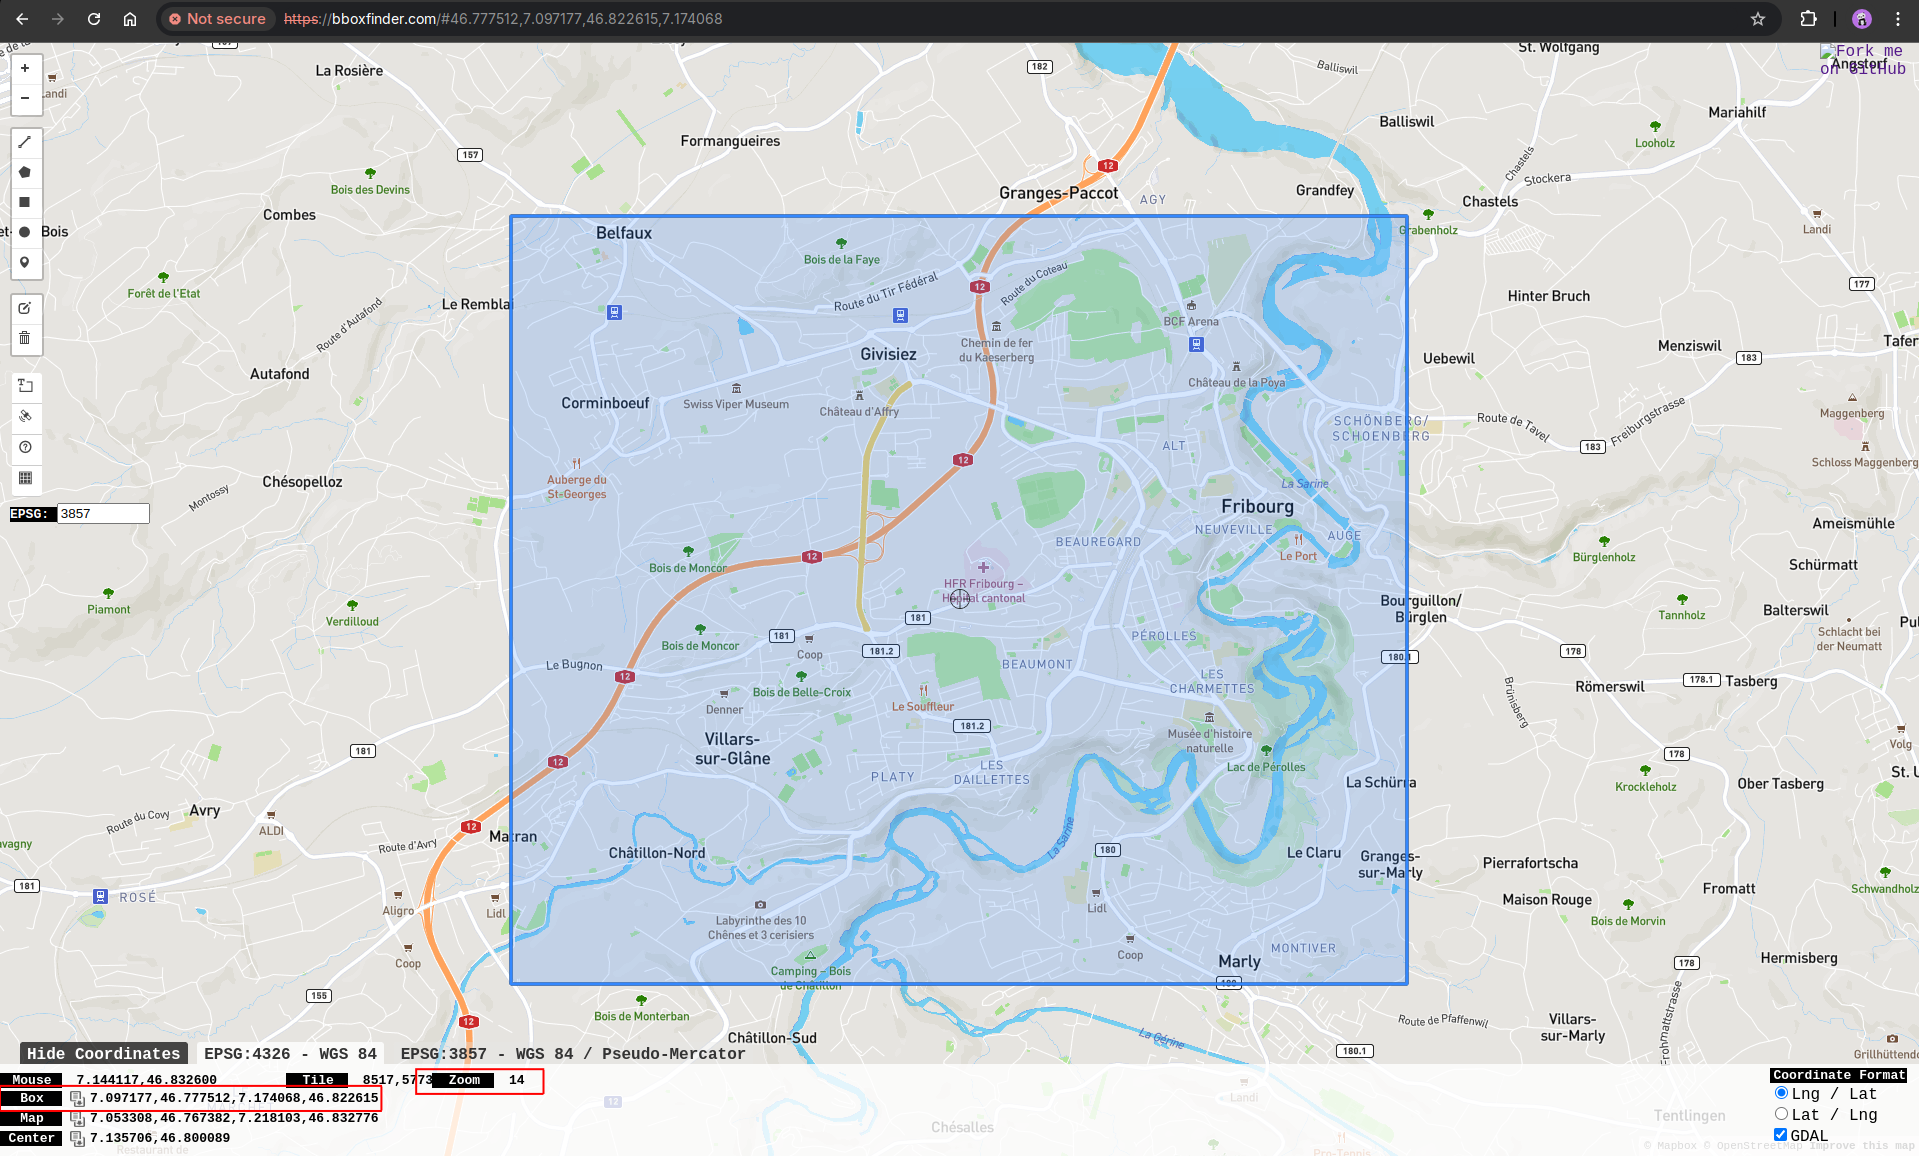
In order to serve offline map, you must first extract it as Protomap. In order to do so, you must specify the bounding box from which to extract the tiles. To find the bounding box, you can use the following tool. In this example, we used the following bounding box.
The tool shows the bounding box as well as the zoom level at which you are showing the map (red square bottom left):
Determine which Protomap to extract data from. You can find the latest build here <https://maps.protomaps.com/builds/>.
Using pmtiles CLI with the bounding box retrieved from the tool, (46.777512,7.097177,46.822615,7.174068) and zoom level (14) we invoke the following command :
pmtiles extract https://build.protomaps.com/20250430.pmtiles CH-fr-Fribourg.pmtiles --minzoom=14 --bbox=7.097177,46.777512,7.174068,46.822615
It creates a file name CH-fr-Fribourg.pmtiles of about 1.5 Megabytes which can be added as a web module.resources file.
3. Create the dashboard with user locked in position
The dashboard is the graphic frontend used to visualize the map. In this case we restrict the user in the same bounding box with maxBounds key, as well as the minimum zoom with minZoom key.
We specify the Protomap to load with protomapSource key as well as MapLibre library.
{
  "configuration": [
    {
      "id": "map",
      "type": "Maps",
      "title": "",
      "mapsWidgetSettings": {
        "layerOptions": [
          {
            "layerId": "root.feature.protomaps.layers",
            "activatedByDefault": true
          }
        ],
        "protomapSource": "/osp/resources/tiles/fr.pmtiles",
        "library": "MapLibre",
        "centerPosition": [
          7.139734,
          46.806418
        ],
        "zoomLevel": 14,
        "maxBounds": [
          [
            7.097176690737683,
            46.77751158309039
          ],
          [
            7.1740675580062145,
            46.82261507130144
          ]
        ],
        "minZoom": 14
      }
    }
  ],
  "layout": {
    "lg": [
      {
        "w": 12,
        "h": 6,
        "x": 0,
        "y": 0,
        "i": "map"
      }
    ]
  },
  "breakpoints": {
    "lg": 1200,
    "md": 996,
    "sm": 768,
    "xs": 480,
    "xxs": 0
  },
  "cols": {
    "lg": 12,
    "md": 10,
    "sm": 6,
    "xs": 4,
    "xxs": 2
  },
  "rowHeight": 150
}
{
    "moduleId": "modules.web.web-1",
    "title": "Protomaps",
    "description": "Location",
    "tags": ["Map"]
}
4. Create the different points and their geo.maps file
The following points is our SDN Office location.
{
    "moduleId": "modules.maps.maps-1",
    "geoJsonString": {
        "type": "Feature",
        "geometry": {
            "type": "Point",
            "coordinates": [
                7.112513501074773,
                46.81264309217151
            ]
        },
        "properties": {
            "name": "SDN Office",
            "label": {
                "name": "SDN SA",
                "text-anchor": "bottom"
            },
            "circle-color": "#003968",
            "linkedDashboard": "root.feature.protomaps.dashboard.office"
        }
    }
}
The following points is the Cathedral of Fribourg.
{
    "moduleId": "modules.maps.maps-1",
    "geoJsonString": {
        "type": "Feature",
        "geometry": {
            "type": "Point",
            "coordinates": [
                7.1626223452155084,
                46.80623409089367
            ]
        },
        "properties": {
            "name": "Cathédrale Fribourg",
            "label": {
                "name": "Fribourg",
                "text-anchor": "bottom"
            },
            "circle-color": "#FA8128",
            "linkedDashboard": "root.feature.protomaps.dashboard.cathedral"
        }
    }
}
Create owner.variables inside the same folder as well as value.ospp for the value to be retrieved by geo.maps file.
5. Configure the layer
Configure the layer.ospp file as well as other layers file (layer.maps and layer.web).
{
    "name": "Fribourg layer",
    "description": "",
    "layerType": "STANDARD",
    "valueType": "POINT",
    "clusteringType": "NONE",
    "mapSources": [
        {
            "type": "STATIC",
            "linkedValues": [
                "root.feature.protomaps.points.cathedral",
                "root.feature.protomaps.points.office"
            ]
        }
    ]
}
6. Result of the example