Interaction on streams using callbacks on a Media widget
This example has for goal to show the possibilities of interaction between output.media, the stream-selector.media and the Media widget.
Connect to an Ant Media server via
antmedia-server.mediaand declare multiple streams withstream.media.Configure a stream selector as the default stream source for the media widget in the dashboard.
Use
output.mediaactions to add or remove a stream from a selector, and to start or stop a stream.Trigger each action via variables and callbacks to control streams interactively from the dashboard.
git checkout origin/osp-media-configuration .
git checkout origin/osp-antmedia-configuration .
git checkout origin/osp-web-configuration .
git checkout origin/osp-variables-configuration .
git checkout origin/example-media-server-stream .
git checkout origin/example-media-action .
Learning goals
How to setup a connection to a Ant Media server using
antmedia-server.media.How to setup a value that contains server’s status in a
value.ospp.How to setup a stream that connects to a video (camera, OBS …)
stream.media.Add a second stream in the widget.
How to add a stream to a selector.
How to remove a stream from a selector.
How to start a stream.
How to stop a stream.
Steps
1. Checkout the example configuration or do it step by step.
For this example, it is possible to checkout the branch directly and modify the different files to be compliant with the user setup.
After every steps it is recommended to commit every changes using the following steps :
git add .
git commit -m "{The comment for the commit here}"
git pull
git push
2. Setup the server Ant Media
Replace properties inside antmedia-server.media with your servers URL, email and password. You can also choose to let the default parameters which will deploy a server in the stack.
{
  "moduleId": "modules.media.media-1",
  "hostname": "http://backend-antmedia",
  "port": 5080,
  "email": "test.test@test.com",
  "password": {
    "type": "PLAINTEXT",
    "password": "testtest"
  }
}
3. Configure the two streams that comes with by default.
Note
It is possible to add as many streams as necessary. For example, if five security cameras are installed in a facility, declaring them in OnSphere means that five independent streams need to be declared.
Warning
The cameras or streams declared will be declared in Ant Media. Ant Media will handle the connection between itself and the camera. This means that Ant Media and the camera need to communicate with one another. The network settings need to be set correctly.
stream.media :
{
    "serverId": "root.stream-server",
    "streamApplication": "LiveApp",
    "endpoint" : {
        "type": "streamSource",
        "streamUrl": {
             "type" : "RAW",
             "url" : "rtsp://testA:testA@X.X.X.X/axis-media/media.amp?videocodec=h264"
        }
    },
    "streamId":"testA"
}
stream.media :
{
    "serverId": "root.stream-server",
    "streamApplication": "LiveApp",
    "endpoint" : {
        "type": "streamSource",
        "streamUrl": {
             "type" : "RAW",
             "url" : "rtsp://testB:testB@X.X.X.X/axis-media/media.amp?videocodec=h264"
        }
    },
    "streamId":"testB"
}
4. Configure the stream selector and the widget in the dashboard.
The stream-selector.media is where the default stream is set. This is also the selector that will be referenced in the dashboard.view.
stream-selector.media :
{
    "moduleId": "modules.media.media-1",
    "defaultStreamIds" : [ "root.stream" ],
    "type" : "SHARED"
}
Concerning the dashboard you can reference to the Media widget and modifiy it using the wanted parameters :
dashboard.view :
{
  "configuration": [
    {
      "type": "Media",
      "id": "L8t1lmuo",
      "title": "",
      "mediaPlayerWidgetSettings": {
        "streamSelectorId": "root.selectorA"
      }
    },
    {
      "valueSubscriptions": {
        "values": [
          {
            "id": "root.streamAction.addStreamToSelector.callback",
            "right": "READ_WRITE"
          },
          {
            "id": "root.streamAction.removeStreamFromSelector.callback",
            "right": "READ_WRITE"
          },
          {
            "id": "root.streamAction.startStream.callback",
            "right": "READ_WRITE"
          },
          {
            "id": "root.streamAction.stopStream.callback",
            "right": "READ_WRITE"
          }
        ]
      },
      "id": "RAHA1dXD",
      "type": "ValueSubscription",
      "title": "Trigger Stream Output"
    }
  ],
  "layout": {
    "lg": [
      {
        "w": 7,
        "h": 6,
        "x": 0,
        "y": 0,
        "i": "L8t1lmuo"
      },
      {
        "w": 5,
        "h": 6,
        "x": 7,
        "y": 0,
        "i": "RAHA1dXD"
      }
    ]
  },
  "breakpoints": {
    "lg": 1200,
    "md": 996,
    "sm": 768,
    "xs": 480,
    "xxs": 0
  },
  "cols": {
    "lg": 12,
    "md": 10,
    "sm": 6,
    "xs": 4,
    "xxs": 2
  },
  "rowHeight": 150
}
5. Configure the outputs.
In this example, all the outputs are present. Those actions let the user control streams and stream-selectors. A complete explanation can be found here.
Add a stream to a selector
output.media :
{
    "moduleId" : "modules.media.media-1",
    "type": "ADD_TO_SELECTOR",
    "selectorId": "root.selectorA"
}
Remove a stream from a selector
output.media :
{
    "moduleId" : "modules.media.media-1",
    "type": "REMOVE_FROM_SELECTOR",
    "selectorId": "root.selectorA"
}
Start a stream
output.media :
{
    "moduleId" : "modules.media.media-1",
    "type": "START_STREAM"
}
Stop a stream
output.media :
{
    "moduleId" : "modules.media.media-1",
    "type": "STOP_STREAM"
}
6. Configure the callbacks and variables
To be able to trigger the outputs we use variables and callbacks as follow :
Callback for add a stream to a selector
callback.ospp :
{
    "linkedOutputs": [
        {
            "outputId": "root.streamAction.addStreamToSelector"
        }
    ]
}
Callback to remove a stream from a selector
callback.ospp :
{
  "linkedOutputs": [
    {
      "outputId": "root.streamAction.removeStreamFromSelector"
    }
  ]
}
Callback to start a stream
callback.ospp :
{
  "linkedOutputs": [
    {
      "outputId": "root.streamAction.startStream"
    }
  ]
}
Callback to stop a stream
callback.ospp :
{
  "linkedOutputs": [
    {
      "outputId": "root.streamAction.stopStream"
    }
  ]
}
8. Result
Once the configuration is pushed you are able to access the default dashboard where the following will be displayed :
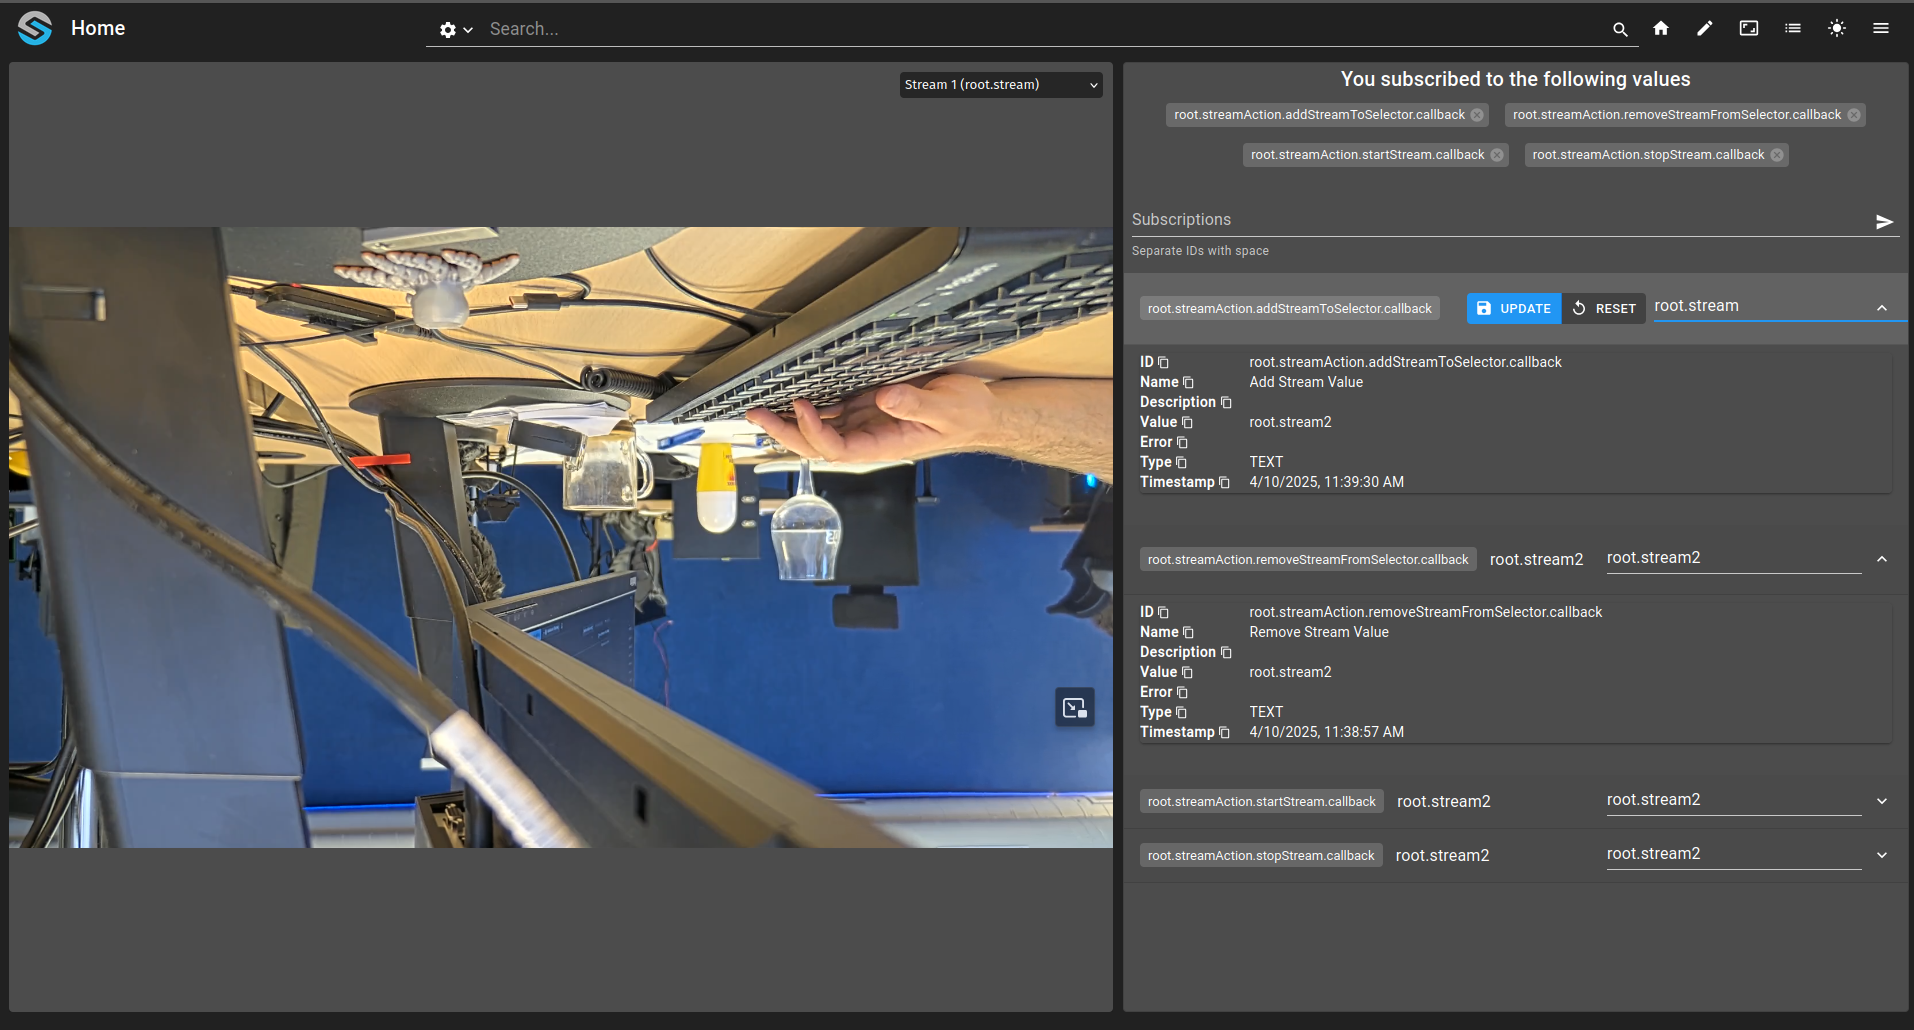
On the right you can see the different parameters concerning the variables. On the left side of the dashboard, the media player is present with the streams that were set as default available.