Managing rights from HTTP rest api
This example demonstrates how to implement rights management using an external service, such as a REST API. This is useful when Keycloak does not receive the rights from the SSO flow or needs to access another API. This can be achieved by utilizing the Enrich keycloak token and configuring a script.
Define a
dynamic-accessright inmodule.rightsand create test users in Keycloak.Simulate an external rights API using a minimal Python Flask service.
Write a Keycloak authorization script that calls the external API at login and merges returned rights into the token.
Confirm that dashboard visibility changes according to the rights provided by the external API.
git checkout origin/osp-web-configuration .
git checkout origin/osp-cli-configuration .
git checkout origin/osp-variables-configuration .
git checkout origin/example-insert-rights-from-external-api .
Steps
1. Define the rights and user
We will create the new following rights inside module.rights.
dynamic-access: Right given dynamically. This is only an example and you can create as many as need to handle you use-case.
modules/rights/rights/module.rights
{
  "messagingConfiguration": {
    "clientId": "osp-rights",
    "host": "rabbit"
  },
  "groups": [
    {
      "name": "all",
      "description": "Access all value",
      "externalLink": [
        "data-access",
        "configuration-management"
      ]
    },
    {
      "name": "dynamic-access",
      "description": "Access define dynamicaly from a collection",
      "externalLink": []
    }
  ]
}
2. Define the user and group
The user user1 and user2 will be also created and used to demonstrate the application of the rights.
modules/keycloak/keycloak-1/users.keycloak
58      "enabled": true,
59      "groups": [
60        "/internal/data-access",
61        "/internal/user"
62      ],
63      "username": "user1",
64      "email": "user1@localhost",
65      "firstName": "user1",
66      "lastName": "user1",
67      "credentials": [
68        {
69          "type": "password",
70          "value": "onsphere",
71          "initial": true
72        }
73      ]
74    },
75    {
76      "enabled": true,
77      "groups": [
78        "/internal/data-access",
79        "/internal/user"
80      ],
81      "username": "user2",
82      "email": "user2@localhost",
83      "firstName": "user2",
84      "lastName": "user2",
85      "credentials": [
86        {
87          "type": "password",
88          "value": "onsphere",
89          "initial": true
90        }
91      ]
92    }
93  ]
3. Create a dashboard only accessible by dynamic-access
The following dashboard show the text Victory to the user able to access it.
root/limited/access.rights
{
    "moduleId": "modules.rights.rights",
    "write": {
        "override": [
            "dynamic-access"
        ]
    },
    "read": {
        "override": [
            "dynamic-access"
        ]
    }
}
root/limited/dashboard.web
{
    "moduleId": "modules.web.web-1",
    "title": "Limited dashboard",
    "description": "Accessible only by member of dynamic-access",
    "tags": []
}
root/limited/dashboard.view
 3    {
 4      "textWidgetSettings": {
 5        "text": "Victory"
 6      },
 7      "id": "vNFhL7oI",
 8      "type": "Text",
 9      "title": ""
10    }
4. Create python script to simulate the api
The following python script simulate a very basic api to give right to a user.
script/main.py
from typing import Dict, Optional

from flask import Flask

users = [
    {"id": "user1@localhost", "access": True},
    {"id": "user2@localhost", "access": False}
]

api = Flask(__name__)


@api.route('/user/<user_id>', methods=['GET'])
def get_user(user_id: str):
    user = find_user(user_id)
    if not user:
        return {"message": "Not found", "success": False}, 404

    return {"success": True, "data": user}, 200


def find_user(user_id: str) -> Optional[Dict[str, any]]:
    for user in users:
        if user["id"] == user_id:
            return user

    return None


if __name__ == '__main__':
    api.run(port=8080, host='0.0.0.0')
It requires Flash to run which can be installed with :
pip install flask
And is run with :
python ./main.py
1. Create the script to handle the rights from the api
We will create the authorization script that will be called when a user log in. It will call the api for the user with it’s email and apply the rights found on top to the one define by the group membership.
modules/keycloak/keycloak-1/authorization.keycloak
{
  "sourceFile": "modules/keycloak/keycloak-1/authorization.js"
}
Note
The script is not required to be inside the same folder as the authorization.keycloak file.
modules/keycloak/keycloak-1/authorization.js
main();

function main() {
  if (!tokenRequest.email) {
    log.warn(
      "No email available for token [{}] and user [{}]",
      tokenRequest.tokenId,
      tokenRequest.userId
    );
    return false;
  }

  const response = http.doGet(
    "http://<hostname>:8080/user/" + tokenRequest.email
  );

  if (!response.isSuccess()) {
    log.warn(
      "Fail to get rights for user [{}] with error [{}]",
      tokenRequest.email,
      response.getError()
    );
    return false;
  }

  const body = JSON.parse(response.getBody());

  if (!body.success) {
    log.warn(
      "Fail to get rights for user [{}] with error [{}]",
      tokenRequest.email,
      body.message
    );
    return false;
  }

  if (body.data.access) {
    authorization.add("dynamic-access");
  }

  return true;
}
6. Log in and explore the dashboard
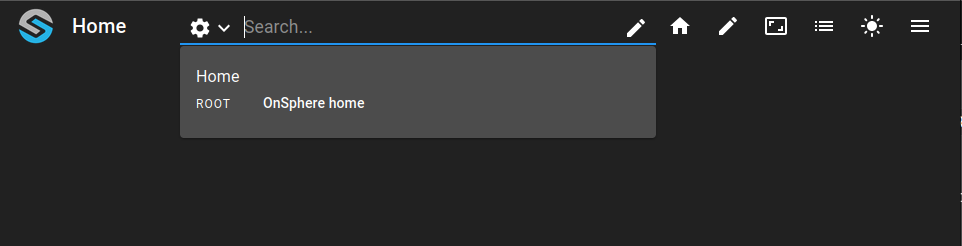
When log in as user2, you will only be able to see the home dashboard.
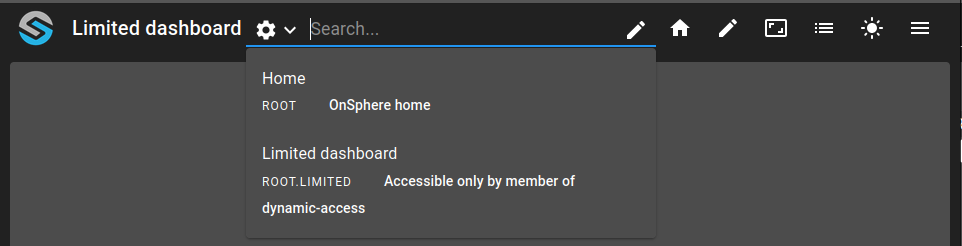
When log in as user1, you will be able to see both dashboard.