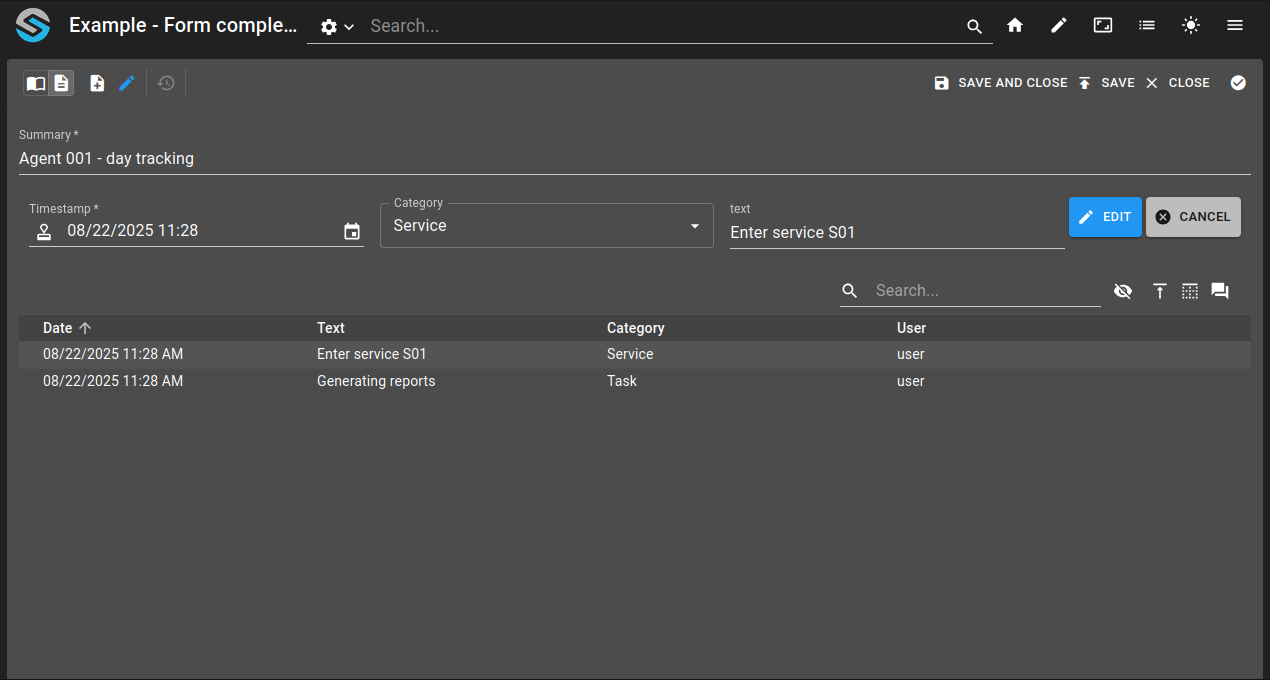
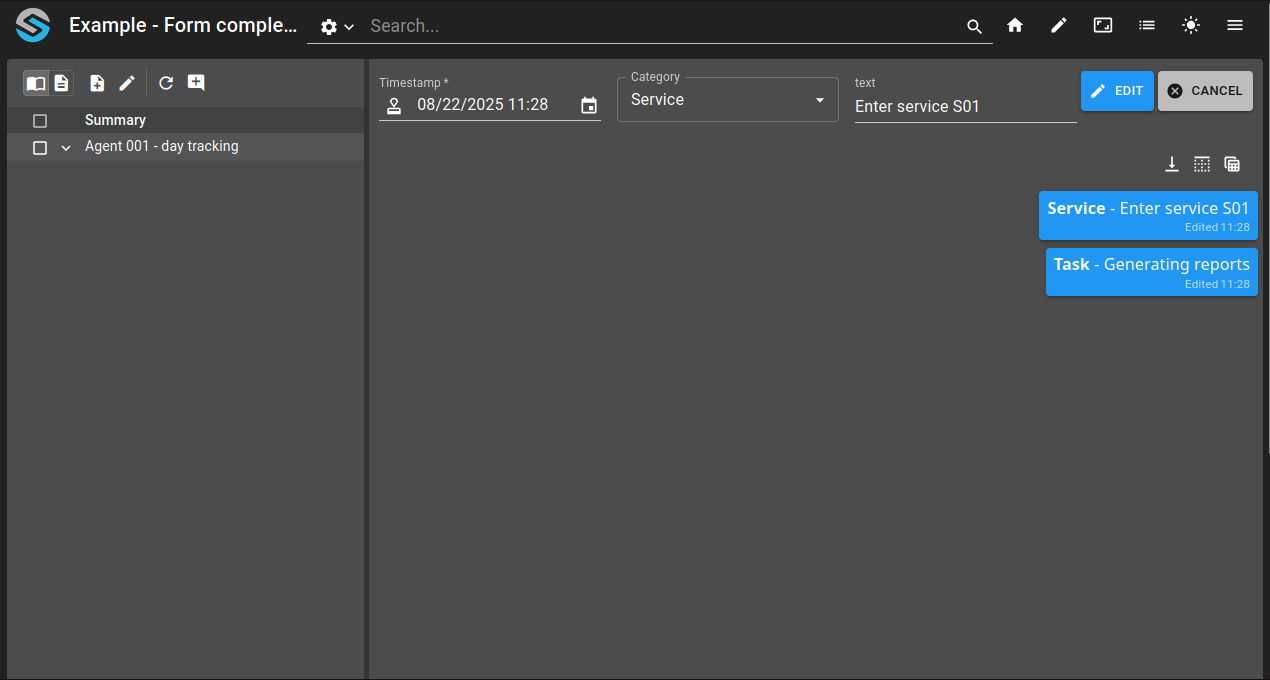
Customize the input and table of a form journal component
This tutorial shows how to customize the journal component in a form in order to add fields to a journal entry.
Create a Category collection to provide selectable values for journal entries.
Define a standalone journal input form with custom fields (timestamp, text, category).
Configure the Journal collection with a
JOURNALrender column usingjournalSettingsOverride.Use a Collection Table widget to interact with the customized journal form on a dashboard.
git checkout origin/osp-web-configuration .
git checkout origin/osp-collections-configuration .
git checkout origin/example-dashboard-form-journal-custom .
Steps
1. Create the Category collection
This collection is just here to provide a list of categories to feed to the events of the Journal collection. Therefore, this collection will only contain a field called text.
Here are the different schema files to define the collection:
root/collections/categories/schema.collections
{
    "moduleId": "modules.collections.collections-1",
    "collectionName": "categories",
    "indexes": [
        {
            "name": "text",
            "index": "{'text': 1}"
        }
    ],
    "filters": [
        {
            "id": "all",
            "query": "{}"
        }
    ]
}
root/collections/categories/schema.ospp
{
    "filters": [
        {
            "id": "all",
            "name": "All"
        }
    ],
    "schema": {
        "type": "object",
        "properties": {
            "text": {
                "type": "string"
            }
        },
        "required": [
            "text"
        ]
    }
}
root/collections/categories/schema.web
{
    "moduleId": "modules.web.web-1",
    "name": "Categories",
    "views": [
        {
            "id": "1",
            "name": "1",
            "reorderable": true,
            "isDefault": true,
            "sort": [],
            "columns": [
                {
                    "name": "text",
                    "field": "text",
                    "position": 0,
                    "render": "STRING"
                }
            ]
        }
    ]
}
In order to offer the user a way to populate this collection, we also need to define a form dedicated to this collection.
root/collections/categories/form/form.web
{
  "moduleId": [
    "modules.web.web-1"
  ],
  "name": "Fiche categorie",
  "description": "",
  "bindings": {},
  "rights": [],
  "schema": "root.collections.categories",
  "ui": {
    "type": "VerticalLayout",
    "elements": [
      {
        "type": "Control",
        "scope": "#/properties/text",
        "label": "text"
      }
    ]
  },
  "submit": {
    "destination": "Request",
    "type": "Deferred"
  }
}
2. Create the journal input form
The second step is to define a standalone form that will represent the input of the journal component present in the form of the Journal collection that we will create later.
This form will consist of the following fields:
timestamp: Timestamp of the journal entry
text: Content of the journal entry
cat: Category of event, from the Category collection
To define this form, we need a form.web and a schema.ospp, as defined here:
root/journal_input/schema.ospp
{
    "filters": [],
    "schema": {
        "type": "object",
        "properties": {
            "timestamp": {
                "type": "number",
                "$comment": "date"
            },
            "text": {
                "type": "string"
            },
            "cat": {
                "type": "string"
            }
        },
        "required": [
            "timestamp",
            "cat"
        ]
    }
}
root/journal_input/form.web
{
  "moduleId": [
    "modules.web.web-1"
  ],
  "name": "Journal Input form",
  "description": "",
  "schema": "root.journal_input",
  "bindings": {},
  "ui": {
    "type": "HorizontalLayout",
    "elements": [
      {
        "type": "Control",
        "scope": "#/properties/timestamp",
        "options": {
            "format": "date-time",
            "autoFill": true,
            "dateTimeFormat": "L HH:mm"
        }
      },
      {
        "type": "Collection",
        "scope": "#/properties/cat",
        "label": "Category",
        "options": {
          "schema": "root.collections.categories",
          "format": "${text}"
        }
      },
      {
        "type": "Control",
        "scope": "#/properties/text",
        "label": "text"
      }
    ]
  }
}
3. Create the Journal collection
The Journal collection will consist of a summary field and a list of events.
First, we need to define the schema files to define the collection.
root/collections/journal/schema.collections
{
    "moduleId": "modules.collections.collections-1",
    "collectionName": "journal",
    "indexes": [
        {
            "name": "summary",
            "index": "{'summary': 1}"
        }
    ],
    "filters": [
        {
            "id": "all",
            "query": "{}"
        }
    ]
}
root/collections/journal/schema.ospp
{
    "filters": [
        {
            "id": "all",
            "name": "All"
        }
    ],
    "schema": {
        "type": "object",
        "properties": {
            "summary": {
                "type": "string",
                "title": "Résumé"
            },
            "events": {
                "type": "array",
                "title": "Events",
                "items": {
                    "type": "object",
                    "properties": {
                        "id": {
                            "type": "string"
                        },
                        "user": {
                            "type": "string"
                        },
                        "text": {
                            "type": "string"
                        },
                        "cat": {
                            "type": "string"
                        },
                        "timestamp": {
                            "type": "number"
                        },
                        "meta": {
                            "type": "array",
                            "items": {
                                "type": "object",
                                "properties": {
                                    "user": {
                                        "type": "string"
                                    },
                                    "timestamp": {
                                        "type": "number"
                                    },
                                    "operation": {
                                        "type": "string"
                                    }
                                }
                            }
                        }
                    }
                }
            }
        },
        "required": [
            "summary"
        ]
    }
}
root/collections/journal/schema.web
Here, we can define a column for the events fields with the JOURNAL render. This column will define how the journal component present on the table side panel will work. So we need to indicate which form to use for the input and how to display the data.
On the options of the column, we can set the journalSettingsOverride to define the form, the timeline text formatter (used for the timeline display of the journal) and the table configuration.
{
    "moduleId": "modules.web.web-1",
    "name": "Fiche générale Sécurité",
    "views": [
        {
            "id": "1",
            "name": "Journal complet",
            "reorderable": true,
            "isDefault": true,
            "tableRowDetail": "journal",
            "sort": [],
            "columns": [
                {
                    "name": "Summary",
                    "field": "summary",
                    "position": 0,
                    "render": "STRING"
                },
                {
                    "name": "Events",
                    "field": "events",
                    "position": 1,
                    "render": "JOURNAL",
                    "display": false,
                    "options": {
                        "summaryFormatterExpression": "${description}",
                        "inputMethod": "Message",
                        "editMode": "all",
                        "displayWithMultipleRows": false,
                        "type": "Table",
                        "journalSettingsOverride": {
                            "form": "root.journal_input",
                            "timelineTextFormatter": "**${cat}** - ${text}",
                            "tableView": {
                                "sort": [
                                  {
                                      "field": "timestamp",
                                      "direction": "desc"
                                  }
                                ],
                                "columns": [
                                  {
                                    "name": "Id",
                                    "field": "id",
                                    "position": 0,
                                    "display": false,
                                    "render": "STRING"
                                  },
                                  {
                                    "name": "Date",
                                    "field": "timestamp",
                                    "position": 1,
                                    "render": "TIMESTAMP",
                                    "options": {
                                      "formatter": "L LT"
                                    }
                                  },
                                  {
                                    "name": "Text",
                                    "field": "text",
                                    "position": 2,
                                    "render": "MARKDOWN"
                                  },
                                  {
                                    "name": "Category",
                                    "field": "cat",
                                    "position": 3,
                                    "render": "STRING"
                                  },
                                  {
                                    "name": "User",
                                    "field": "user",
                                    "position": 4,
                                    "render": "STRING"
                                  },
                                  {
                                    "name": "Meta",
                                    "field": "meta",
                                    "position": 5,
                                    "width": "auto",
                                    "display": false,
                                    "render": "JOURNAL_METADATA"
                                  }
                                ]
                              }
                        }
                    }
                }
            ]
        }
    ]
}
Now, we can define a form for the collection and apply the same settings for the journal component as for the schema column.
root/collections/journal/form/form.web
{
  "moduleId": [
    "modules.web.web-1"
  ],
  "name": "Events",
  "description": "",
  "bindings": {},
  "rights": [],
  "schema": "root.collections.journal",
  "ui": {
    "type": "VerticalLayout",
    "elements": [
      {
        "type": "Control",
        "scope": "#/properties/summary",
        "label": "Summary"
      },
      {
        "type": "Journal",
        "scope": "#/properties/events",
        "label": "Events",
        "options": {
          "height": "400px",
          "journalWidgetSettings": {
            "type": "Table",
            "inputMethod": "TimestampMessage",
            "actionsPosition": "top",
            "timestampSort": "asc",
            "autoFocus": false,
            "journalEditMode": "all",
            "journalSettingsOverride": {
              "form": "root.journal_input",
              "timelineTextFormatter": "**${cat}** - ${text}",
              "tableView": {
                "sort": [
                  {
                    "field": "timestamp",
                    "direction": "desc"
                  }
                ],
                "columns": [
                  {
                    "name": "Id",
                    "field": "id",
                    "position": 0,
                    "display": false,
                    "width": "auto",
                    "render": "STRING"
                  },
                  {
                    "name": "Date",
                    "field": "timestamp",
                    "position": 1,
                    "render": "TIMESTAMP",
                    "width": "auto",
                    "display": true,
                    "options": {
                      "formatter": "L LT"
                    }
                  },
                  {
                    "name": "Text",
                    "field": "text",
                    "position": 2,
                    "width": "auto",
                    "display": true,
                    "render": "MARKDOWN"
                  },
                  {
                    "name": "Category",
                    "field": "cat",
                    "position": 3,
                    "width": "auto",
                    "display": true,
                    "render": "STRING"
                  },
                  {
                    "name": "User",
                    "field": "user",
                    "position": 4,
                    "width": "auto",
                    "display": true,
                    "render": "STRING"
                  },
                  {
                    "name": "Meta",
                    "field": "meta",
                    "position": 5,
                    "width": "auto",
                    "display": false,
                    "render": "JOURNAL_METADATA"
                  }
                ]
              }
            }
          }
        }
      }
    ]
  },
  "initialValue": {},
  "submit": {
    "destination": "Request",
    "type": "Deferred"
  }
}
4. Use a Collection Table widget to interact with the form
To finalize this example, we will simply define a dashboard with a Collection Table that use as a default schema the Journal collection schema.
root/dashboards/journal/dashboard.view
{
  "configuration": [
    {
      "type": "CollectionTable",
      "id": "D2H2STZ3",
      "title": "",
      "menuReferences": [],
      "collectionTableWidgetSettings": {
        "defaultSchemas": ["root.collections.journal"],
        "defaultFilter": "all",
        "defaultDisplayType": "table",
        "pageSize": 100,
        "pageSizes": [
          50,
          100,
          200
        ],
        "resizeMode": "widget",
        "rowDetailHeight": 500,
        "disableToolbarTableRefresh": false,
        "disableUrlHistory": true,
        "disableSchemaUpdate": false,
        "disableViewUpdate": false,
        "disableFilterUpdate": false,
        "disableToolbar": false,
        "disableToolbarMenu": false,
        "disableSidePanel": false,
        "disableToolbarExport": false,
        "disableToolbarColumnShowHide": false,
        "disableToolbarFilterShowHide": false,
        "disableToolbarSummaryShowHide": false,
        "disableToolbarSearch": true,
        "disableToolbarColumnChooser": false,
        "disableToolbarClearFilter": false,
        "iconTableView": "import_contacts",
        "iconFormView": "description",
        "iconCreateEntry": "note_add",
        "iconSidePanel": "add_comment",
        "iconExportPanel": "file_download",
        "submitSettings": {
          "submitText": "Save and close",
          "applyText": "Save"
        }
      }
    }
  ],
  "layout": {
    "lg": [
      {
        "w": 12,
        "h": 7,
        "x": 0,
        "y": 0,
        "i": "D2H2STZ3"
      }
    ]
  },
  "breakpoints": {
    "lg": 1200,
    "md": 996,
    "sm": 768,
    "xs": 480,
    "xxs": 0
  },
  "cols": {
    "lg": 12,
    "md": 10,
    "sm": 6,
    "xs": 4,
    "xxs": 2
  },
  "rowHeight": 150
}
Upon loading the dashboard, when entering in edition mode or when displaying the table side panel, you should see your journal with the extra Category field.