Connect an OPC UA client to read, write and use methods from a server.
In this tutorial, you will learn how to create an OPC UA client and use it with your OPC UA server. You will only need an OPC UA server to connect to.
Generate and share a Docker secret to store an encrypted device password.
Import the OPC UA server X.509 certificate into the configuration.
Read boolean, integer and string node values from the OPC UA server.
Write a value or call a method on the server using OPC UA outputs and callbacks.
Subscribe to node changes and display live values on a dashboard.
git checkout origin/osp-alarms-configuration .
git checkout origin/osp-web-configuration .
git checkout origin/osp-opc-ua-configuration .
git checkout origin/osp-variables-configuration .
git checkout origin/example-opc-ua-read-write-methods-using-various-parameters .
Prerequisites
An OPC-UA Server
In general be sure to have a correctly configured OPC UA server that will accept your connection using the certificates correctly. Also don’t forget to add the certificates inside the certs/external directory.
The complete example can be retrieved using the following command:
Note
If you decided to checkout the origin/example-opc-ua-read-write-methods-using-various-parameters branch, do not forget to replace the IP used in configuration files with your own stack’s IP.
Learning goals
How to read a value on your OPC UA Server
How to write a value on your OPC UA Server
How to use a method on your OPC UA Server
How to use encrypted password method to store device password
Configuration structure
![@startuml
skinparam backgroundColor transparent
package "root/opc-ua" as opcua {
package "device" {
[device.opc-ua] as deviceopc
[value.ospp] as valueDevice
}
package "boolean-value" {
[owner.opc-ua] as booleanValue
[value.ospp] as booleanValueValue
}
package "int-value" {
[owner.opc-ua] as intValue
[value.ospp] as intValueValue
}
package "string-value" {
[owner.opc-ua] as stringValue
[value.ospp] as stringValueValue
}
package "write-output" {
[output.opcua] as writeoutput
}
package "method-output" {
[output.opcua] as methodoutput
}
}
package "root/dashboard" as db {
[dashboard.view] as dashboardview
[dashboard.web] as dashboardweb
}
package "callback-1" as callbackOne {
[callback.ospp] as callback1
[owner.variables] as variable1
[value.ospp] as variable1Value
}
package "callback-2" as callbackTwo {
[callback.ospp] as callback2
[owner.variables] as variable2
[value.ospp] as variable2Value
}
node ospvar as "osp-variables"
node ospweb as "osp-web"
node ospopcua as "osp-opc-ua"
ospweb -[#black]-> db : **Own**
ospopcua -[#black]r-> opcua : **Own**
ospvar -[#black]-> callbackOne : **Own**
ospvar -[#black]-> callbackTwo : **Own**
dashboardview -[#black]-> valueDevice : Subscribe on device status
dashboardview -[#black]-> booleanValueValue : Subscribe on Node value
dashboardview -[#black]-> intValueValue : Subscribe on Node value
dashboardview -[#black]-> stringValueValue : Subscribe on Node value
callback1 -[#black]-> methodoutput : Trigger when needed
callback2 -[#black]-> writeoutput : Trigger when needed
@enduml](../_images/plantuml-1966ddd3abdf89198d17fcde945c8d0b703adc0d.png)
1. Generate the key for password encryption
To allow the osp-configuration-dispatcher to decrypt the password a key must be shared as a docker secret.
Create the secret
echo -n "encryptedPassword-example-àüöé-..,-" | base64 | docker secret create key-a -
The declare the secret as an external source
stack/stack.secrets
Add the key-a to the stack.secrets section of your stack configuration. This will give the stack access to this secret
secrets:
  key-a:
    external: true
Then the secret must be shared with the container who is using it, this is done by declaring the secret in the stack.secrets key-a
secrets:
- source: ${{stackid}}_admin-pwd
  target: admin-pwd
- ${{auto-generated-secret-access}}
- source: key-a
  target: key-a
modules_configuration-dispatcher_main:
# The osp_configuration-dispatcher name must not be changed.
  image: ${{image-repository}}osp-configuration-dispatcher${{image-version}}
  networks:
    - "back"
    - "portainer"
  ports:
    - target: 5022
      published: 5022
      protocol: tcp
    - target: 9100
      published: 9102
      protocol: tcp
    - ${{remote-port:"10000:10000/tcp"}}
    - ${{debug-port:5005}}
  volumes:
    - "osp-git:/git:rw"
    - "osp-runtime-configuration:/osp/run/config/:rw"
  configs:
    - source: osp-config-1
      target: /osp/config/portainer.json
  secrets:
    - source: ${{stackid}}_admin-pwd
      target: admin-pwd
    - ${{auto-generated-secret-access}}
    - source: key-a
      target: key-a
  ${{optional-env-section}}:
    - ${{image-repo-env}}
    - ${{image-version-env}}
Push the configuration. The dispatcher must have access to the secret key in order to decrypt the password and accept a configuration that includes password encryption.
2. Import the server certificate
OPC-UA authentication use X509 certificate, the first step is to publish your server certificate in certsexternal
Replace the file content with the server certificate
certs/external/opcser.crt
Bag Attributes
    friendlyName: server-ai
    localKeyID: 54 69 6D 65 20 31 36 36 32 39 38 38 38 32 37 33 31 37
subject=CN = Eclipse Milo Example Server, O = digitalpetri, OU = dev, L = Folsom, ST = CA, C = US

issuer=CN = Eclipse Milo Example Server, O = digitalpetri, OU = dev, L = Folsom, ST = CA, C = US

-----BEGIN CERTIFICATE-----
MIIEnzCCA4egAwIBAgIGAYMx27lBMA0GCSqGSIb3DQEBCwUAMHYxJDAiBgNVBAMM
G0VjbGlwc2UgTWlsbyBFeGFtcGxlIFNlcnZlcjEVMBMGA1UECgwMZGlnaXRhbHBl
dHJpMQwwCgYDVQQLDANkZXYxDzANBgNVBAcMBkZvbHNvbTELMAkGA1UECAwCQ0Ex
CzAJBgNVBAYTAlVTMB4XDTIyMDkxMTIyMDAwMFoXDTI1MDkxMTIyMDAwMFowdjEk
MCIGA1UEAwwbRWNsaXBzZSBNaWxvIEV4YW1wbGUgU2VydmVyMRUwEwYDVQQKDAxk
aWdpdGFscGV0cmkxDDAKBgNVBAsMA2RldjEPMA0GA1UEBwwGRm9sc29tMQswCQYD
VQQIDAJDQTELMAkGA1UEBhMCVVMwggEiMA0GCSqGSIb3DQEBAQUAA4IBDwAwggEK
AoIBAQDNhO8TRdNq+ogu9Tib8gMUaqJtwhcUW/cEdBI9tWIdh4g78xZaoQQyC1Uk
HjAX1O3zkSm+VEcNHqDmkqoOXqHhr4FgxgwPc3LyX7VxdyEjnSOLw1aTwE5ec4Jv
RnDqzch8uEeNfy/3YLkty5J8eJEYCZtVzowaERmOTtDNc5Qr7FvwNpNdnJyb1xo6
LSzb9WuWBqZ3UEDDeEU84O0LndlFD/vbx+imdn0CS8ISqC6at0Ao54E0sJDreD9C
T1fyiKQVC4+gFvFkVJFfwhTx8Ow57nqP3f9EFWQ3nS2vvizozJO3EzRGjNczzInW
AT/phQWJPokhiBwJFSV9dBfBIgELAgMBAAGjggExMIIBLTAfBgNVHSMEGDAWgBTq
ULVnNoNQkYHAuEHZAoyi09eJcjAMBgNVHRMEBTADAQH/MAsGA1UdDwQEAwIC/DAd
BgNVHSUEFjAUBggrBgEFBQcDAgYIKwYBBQUHAwEwgbAGA1UdEQSBqDCBpYZFdXJu
OmVjbGlwc2U6bWlsbzpleGFtcGxlczpzZXJ2ZXI6YTEyMDlmYzUtMjk5MC00ZTk3
LWE4MzEtMDljZDY2MWExNzIwgiZ2aWN0b3Jyb21pbmdlci1IUC1FbGl0ZURlc2st
ODAwLUcxLVNGRoIWc3RhY2stMS5vbnNwaGVyZS5sb2NhbIcEwKh6AYcErBgAAYcE
rBIAAYcErBEAAYcECm4A6TAdBgNVHQ4EFgQU6lC1ZzaDUJGBwLhB2QKMotPXiXIw
DQYJKoZIhvcNAQELBQADggEBACRGOIYfN+//B72VDRf/aknXeY4e0XuGDYkZlHXn
LOw1quqIH/4X7t0q3XrMUeywjYs11mXIvgmV+ZF83eWrQe++LOR7qTXlZESpMqWe
HkosVbV7jSJ9d5LZqg3arPmH7XU0cdDKg++/xxEMsm40tAIPvHcZs8coYkVK7GaX
tll/o2rBFOwfvKqeGKENieOlV8k72mH9TS2bzakx6BQDjBtYQnvIUwdDd1g6gLC+
20S8tmjPddbdN3PbWp2z11wKhElgVCGPFa+GNYCYaOyFH/40vElNAqlE80egaZPn
jRQ9Mc3e+BSUMLyHyoFQqd/cjaPsnYy7nmHpmYDeZjP+pLg=
-----END CERTIFICATE-----
3. Create the dashboard to visualize the values
Create a dashboard with a widget where you can subscribe to values.
root/dashboard/dashboard.view
{
  "configuration": [
    {
      "type": "ValueSubscription",
      "id": "vdwEzlGo",
      "title": "test",
      "valueSubscriptions": {
        "values": [
          {
            "id": "root.opc-ua.device",
            "type": "BOOLEAN",
            "right": "READ"
          },
          {
            "id": "root.opc-ua.boolean-value",
            "type": "BOOLEAN",
            "right": "READ"
          }
        ]
      }
    },
    {
      "valueSubscriptions": {
        "values": [{"id": "root.opc-ua.callback-1","right": "READ_WRITE"}]
      },
      "basicWidgetSettings": {
        "showTooltip": true
      },
      "id": "YNu7-D8O",
      "type": "BasicInputOutputValue",
      "title": "testes"
    }
  ],
  "layout": {
    "lg": [
      {
        "w": 5,
        "h": 7,
        "x": 1,
        "y": 0,
        "i": "vdwEzlGo"
      },
      {
        "w": 4,
        "h": 2,
        "x": 7,
        "y": 0,
        "i": "YNu7-D8O"
      }
    ]
  },
  "breakpoints": {
    "lg": 1200,
    "md": 996,
    "sm": 768,
    "xs": 480,
    "xxs": 0
  },
  "cols": {
    "lg": 12,
    "md": 10,
    "sm": 6,
    "xs": 4,
    "xxs": 2
  }
}
root/dashboard/dashboard.web
{
    "moduleId": "modules.web.web-1",
    "title": "Home",
    "description": "OnSphere home",
    "tags": []
}
4. Create different OPC-UA elements
Generation of encrypted password
See the Toolbox to generate the password. The entries used are:
Password : “encryptedPassword-example-àüöé-..,-
Input : demo
Hint
The result of each encryption is different because a random seed is used for the IV. The IV is stored inside the password allowing the system to decrypt it.
Encrypted Toolbox Usage
Launch the toolbox using the command Ctrl+Shift+P, then select:
osp: Toolbox
This will open the following panel:
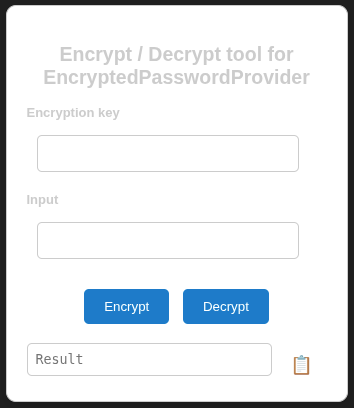
The
Encryption keyfield contains the secret key shared between the user and the orchestrator.The
Inputfield is used to enter the password to encrypt or decrypt.
The Result field displays either the base64-encoded password or the decrypted password, depending on the selected action.
The device :
root/opc-ua/device/device.opc-ua
Note
If you decided to checkout the origin/example-opc-ua-read-write-methods-using-various-parameters branch, do not forget to configure the information relatives to your server (the IP, port, folder and Nodes). If you want to use this as such you can refer to the following github project and use the server example https://github.com/Azure-Samples/iot-edge-opc-plc
{
    "moduleId": "modules.opc-ua.opc-ua-1",
    "hostname": "todoreplace",
    "port": 50000,
    "folder": "OPCUA/SimulationServer",
    "authenticationMethod": {
        "type": "UsernamePassword",
        "passwordProvider": {
            "encryptedPassword": "WkgCvl5blU97rOV26f0EBhathzQXujWLja11R5Am+W4=",
            "type": "ENCRYPTED",
            "secretPath": "/run/secrets/key-a"
        },
        "username": "sysadmin"
    }
}
root/opc-ua/device/value.ospp
{
    "name": "Device status",
    "description": "",
    "type": "BOOLEAN"
}
The two outputs, the first one using a method and the second one using a standard write :
root/opc-ua/method-output/output.opc-ua
{
    "linkedDevice": "root.opc-ua.device",
    "methodObjectNodeId": {
        "s": "Methods",
        "ns": 3
    },
    "methodNodeId": {
        "s": "ResetStepUp",
        "nsu": "http://microsoft.com/Opc/OpcPlc/"
    },
    "type": "Method"
}
root/opc-ua/write-output/output.opc-ua
{
    "type": "Write",
    "linkedDevice": "root.opc-ua.device",
    "nodeId": {
        "s": "SlowUInt1",
        "ns": 3
    }
}
Different values, representing a Node of different type that we will read every seconds :
root/opc-ua/int-value/owner.opc-ua
{
    "type": "DirectRead",
    "linkedDevice": "root.opc-ua.device",
    "nodeId": {
        "nsu": "http://microsoft.com/Opc/OpcPlc/",
        "s": "SlowUInt1"
    },
    "pollingFrequency": {
        "value": 1,
        "unit": "SECONDS"
    }
}
root/opc-ua/int-value/value.ospp
{
    "name": "Test value DirectRead",
    "description": "",
    "type": "INTEGER"
}
Creation of a OPC UA subscription on a boolean value that we read :
root/opc-ua/boolean-subscribe/owner.opc-ua
{
    "type": "Subscription",
    "linkedDevice": "root.opc-ua.device",
    "nodeId": "nsu=http://microsoft.com/Opc/OpcPlc/;s=AlternatingBoolean",
    "samplingInterval": {
        "value": 1,
        "unit": "SECONDS"
    }
}
root/opc-ua/boolean-subscribe/value.ospp
{
    "name": "Test value DirectRead",
    "description": "",
    "type": "BOOLEAN"
}
4. Write variables that can handle outputs
Here is an example of a callback using a variable to call an output (the corresponding output is defined below) :
root/opc-ua/callback-1/callback.ospp
{
    "linkedOutputs": [
        {
            "outputId": "root.opc-ua.method-output"
        }
    ]
}
root/opc-ua/callback-1/owner.variables
{
    "moduleId": "modules.variables.variables-1"
}
root/opc-ua/callback-1/value.ospp
{
    "name": "Test val",
    "description": "",
    "type": "BOOLEAN"
}
5. Result of the example
Connect to the frontend and go to the dashboard corresponding to the above configuration. There you can use the search field to subscribe to a value.
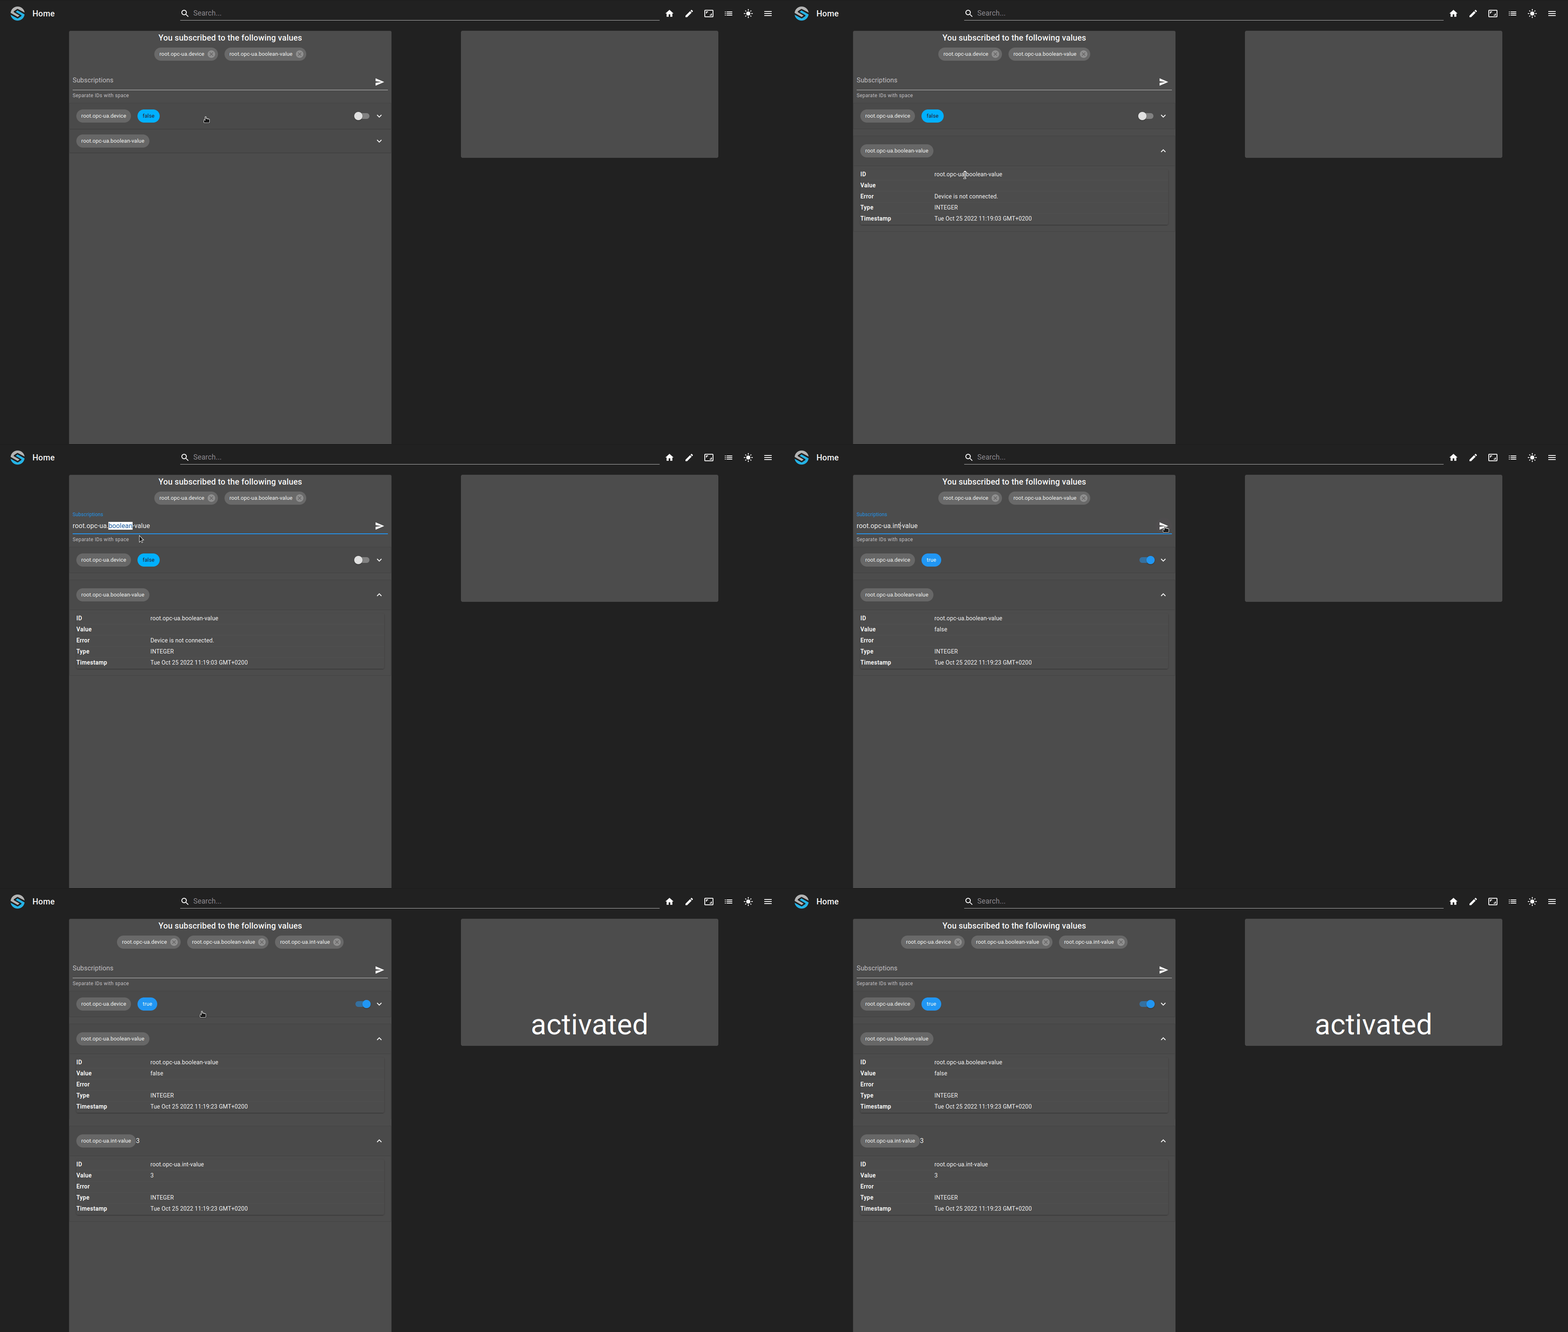
Warning
Be aware that you have to correctly configure the certificates (if in use) to be able to connect and subscribe to the values.