Show a Collection table with data from multiple collections
This tutorial shows how to add a Collection table that displays one or multiple elements from multiple collections.
Create two separate collections (company and person) with shared views and filters, plus collection-specific ones.
Use
allowNullColumns: trueon a shared view that references properties not present in all collections.Enable
multiple: trueon the CollectionTable widget and set multiple schemas as the default.Only views and filters present in all listed collections are exposed in the table interface.
git checkout origin/osp-web-configuration .
git checkout origin/osp-collections-configuration .
git checkout origin/example-dashboard-collections-multiple .
Steps
1. Create companies collection
A company is represented by the following properties:
name: Name of the company, string valueage: Age of the company, number valueaddress: Address of the company, string valuephone number: Phone number of the company, string valuewebsite: Website of the company, string value
root/collections/company/schema.ospp
Your schema.ospp should look like this:
    "schema": {
        "type": "object",
        "properties": {
            "name": { "type": "string" },
            "age": {"type": "number" },
            "phone": {"type": "string"},
            "address": {"type": "string"},
            "website": { "type": "string" }
        }
    },
Since the goal is to use this collection with a Collection table, we will add some views, filters and a form to this collection.
Views
These views will be used by a table expect to work with multiple collections at once. Therefore, the two collections we will create must share at least one view and one filter in common.
To achieve that, we define three views:
default_company: this basic view is only present in the company collection. This should not be available as a view of the collection table when we combine the two collections together.person_company: this view is present for both collections and only contains columns that are present in both of them (name, age, address and phone number). This should be available as a view of the collection table.person_company_advanced: this view is present for both collections, but contains columns that are not present in both of them (website). This too should be available as a view of the collection table.
root/collections/company/schema.web
Your schema.web should look like this:
{
    "moduleId": "modules.web.web-1",
    "name": "Companies",
    "displayedProperty": "name",
    "views": [
        {
            "id": "default_company",
            "name": "Default company",
            "reorderable": true,
            "sort": [],
            "columns": [
                {
                    "name": "Name",
                    "field": "name",
                    "position": 0,
                    "render": "STRING"
                }
            ]
        },
        {
            "id": "person_company",
            "name": "Default",
            "reorderable": true,
            "sort": [],
            "columns": [
                {
                    "name": "Name",
                    "field": "name",
                    "position": 0,
                    "render": "STRING"
                },
                {
                    "name": "Phone",
                    "field": "phone",
                    "position": 1,
                    "render": "STRING"
                },
                {
                    "name": "Address",
                    "field": "address",
                    "position": 2,
                    "render": "STRING"
                }
            ]
        },
        {
            "id": "person_company_advanced",
            "name": "Advanced",
            "reorderable": true,
            "sort": [],
            "columns": [
                {
                    "name": "Name",
                    "field": "name",
                    "position": 0,
                    "render": "STRING"
                },
                {
                    "name": "Phone",
                    "field": "phone",
                    "position": 1,
                    "render": "STRING"
                },
                {
                    "name": "Address",
                    "field": "address",
                    "position": 2,
                    "render": "STRING"
                },
                {
                    "name": "Website",
                    "field": "website",
                    "position": 3,
                    "render": "STRING"
                }
            ]
        }
    ]
}
Filters
For filters, we proceed as for views, meaning we create filters that are meant to be present in both collection and a filter that is only available for companies.
To achieve that, we define three filters:
all: basic filter present in both collections which return every element. This should be available as a filter in the collection table.phone: filter present in both collections which return every element that has an existing phone number. This should be available as a view of the collection table.website: filter present only for companies which return every element that has an existing website. This should not be available as a view of the collection table.
root/collections/company/schema.collections
Your schema.collections should look like this:
{
    "moduleId": "modules.collections.collections-1",
    "collectionName": "companies",
    "indexes": [
    ],
    "filters": [
        {
            "id": "all",
            "query": "{}"
        },
        {
            "id": "phone",
            "query": "{phone: { $exists: true }}"
        },
        {
            "id": "website",
            "query": "{website: { $exists: true }}"
        }
    ]
}
Form
To finish this collection, we need a form to be able to create/edit entries in this collection from the table. Nothing specifically noteworthy here for the purpose of the tutorial.
root/collections/company/form.web
Your form.web should look like this:
{
    "moduleId": "modules.collections.collections-1",
    "collectionName": "companies",
    "indexes": [
    ],
    "filters": [
        {
            "id": "all",
            "query": "{}"
        },
        {
            "id": "phone",
            "query": "{phone: { $exists: true }}"
        },
        {
            "id": "website",
            "query": "{website: { $exists: true }}"
        }
    ]
}
Now that the companies collection is reading, we need to define the persons collection, following the same logic as we went through for the companies (matching views and filters).
2. Create persons collection
A person is represented by the following properties:
name: Name of the company, string valueage: Age of the company, number valueaddress: Address of the company, string valuephone number: Phone number of the company, string value
The difference between a company and a person is that a person lacks a website property, which will have an impact when defining the views.
root/collections/person/schema.ospp
Your schema.ospp should look like this:
    "schema": {
        "type": "object",
        "properties": {
            "name": { "type": "string" },
            "age": {"type": "number" },
            "phone": {"type": "string"},
            "address": {"type": "string"}
        }
    },
    "filters": [
Views
At least, we need to create two views matching the person_company and person_company_advanced. The issue is that person_company_advanced contains a column that represents a property website that doesn’t exist in the persons collection. Therefore, we need to set allowNullColumns as true in order to disable the check on column matching for the person_company_advanced.
To achieve that, we define three views:
default_person: this basic view is only present in the persons collection. This should not be available as a view of the collection table when we combine the two collections together.person_company: this view is present for both collections and only contains columns that are present in both of them. This should be available as a view of the collection table.person_company_advanced: this view is present for both collections, but contains columns that are not present in the persons collection. Needs the use ofallowNullColumnsin order to be validated. This should be available as a view of the collection table.
root/collections/person/schema.web
Your schema.web should look like this:
{
    "moduleId": "modules.web.web-1",
    "name": "Persons",
    "displayedProperty": "name",
    "views": [
        {
            "id": "default_person",
            "name": "Default person",
            "reorderable": true,
            "sort": [],
            "columns": [
                {
                    "name": "Name",
                    "field": "name",
                    "position": 0,
                    "render": "STRING"
                }
            ]
        },
        {
            "id": "person_company",
            "name": "Default",
            "reorderable": true,
            "sort": [],
            "columns": [
                {
                    "name": "Name",
                    "field": "name",
                    "position": 0,
                    "render": "STRING"
                },
                {
                    "name": "Phone",
                    "field": "phone",
                    "position": 1,
                    "render": "STRING"
                },
                {
                    "name": "Address",
                    "field": "address",
                    "position": 2,
                    "render": "STRING"
                }
            ]
        },
        {
            "id": "person_company_advanced",
            "name": "Advanced",
            "reorderable": true,
            "allowNullColumns": true,
            "sort": [],
            "columns": [
                {
                    "name": "Name",
                    "field": "name",
                    "position": 0,
                    "render": "STRING"
                },
                {
                    "name": "Phone",
                    "field": "phone",
                    "position": 1,
                    "render": "STRING"
                },
                {
                    "name": "Address",
                    "field": "address",
                    "position": 2,
                    "render": "STRING"
                },
                {
                    "name": "Website",
                    "field": "website",
                    "position": 3,
                    "render": "STRING"
                }
            ]
        }
    ]
}
Filters
As for the companies collection, we define three filters (phone and all are mandatory):
all: basic filter present in both collections which return every element. This should be available as a filter in the collection table.phone: filter present in both collections which return every element that has an existing phone number. This should be available as a view of the collection table.website: filter present only for companies which return every element that has an existing website. This should not be available as a view of the collection table.
root/collections/person/schema.collections
Your schema.collections should look like this:
{
    "moduleId": "modules.collections.collections-1",
    "collectionName": "persons",
    "indexes": [
    ],
    "filters": [
        {
            "id": "all",
            "query": "{}"
        },
        {
            "id": "phone",
            "query": "{phone: { $exists: true }}"
        },
        {
            "id": "adults",
            "query": "{age: {$gt: 17}}"
        }
    ]
}
Form
To finish this collection, we need a form to be able to create/edit entries in this collection from the table.
root/collections/person/form.web
Your form.web should look like this:
{
    "moduleId": "modules.collections.collections-1",
    "collectionName": "persons",
    "indexes": [
    ],
    "filters": [
        {
            "id": "all",
            "query": "{}"
        },
        {
            "id": "phone",
            "query": "{phone: { $exists: true }}"
        },
        {
            "id": "adults",
            "query": "{age: {$gt: 17}}"
        }
    ]
}
Now that both collections are ready, we can create our dashboard.
3. Create dashboard with a table
In order to be able to merge multiple collections together, the table settings must have multiple set as true. Furthermore, we set both of our collections as the default schema for the table so it loads automatically both collections.
root/dashboards/dashboard.view
Your Dashboard view should look like this:
{
    "configuration": [
        {
            "type": "CollectionTable",
            "id": "7kyvK-aU",
            "title": "",
            "collectionTableWidgetSettings": {
                "defaultSchemas": [
                    "root.collections.person",
                    "root.collections.company"
                ],
                "defaultFilter": "all",
                "multiple": true,
                "disableDisplayTypes": [],
                "defaultDisplayType": "table",
                "defaultForm": "root.collections.company",
                "disableFormPicker": false,
                "disableFormCreate": false,
                "disableFormEdit": false,
                "disableFormHistory": false,
                "pageSize": 50,
                "pageSizes": [
                    50,
                    100,
                    200
                ],
                "resizeMode": "widget",
                "disableToolbarTableRefresh": false,
                "disableSchemaUpdate": false,
                "disableViewUpdate": false,
                "disableFilterUpdate": false,
                "disableToolbar": false,
                "disableToolbarMenu": false,
                "disableSidePanel": false,
                "disableToolbarExport": false,
                "disableToolbarColumnShowHide": false,
                "disableToolbarFilterShowHide": false,
                "disableToolbarSummaryShowHide": false,
                "disableToolbarSearch": false,
                "disableToolbarColumnChooser": false,
                "disableToolbarClearFilter": false
            }
        }
    ],
    "layout": {
        "lg": [
            {
                "w": 9,
                "h": 2,
                "x": 0,
                "y": 3,
                "i": "7kyvK-aU"
            }
        ]
    },
    "breakpoints": {
        "lg": 1200,
        "md": 996,
        "sm": 768,
        "xs": 480,
        "xxs": 0
    },
    "cols": {
        "lg": 12,
        "md": 10,
        "sm": 6,
        "xs": 4,
        "xxs": 2
    },
    "rowHeight": 150
}
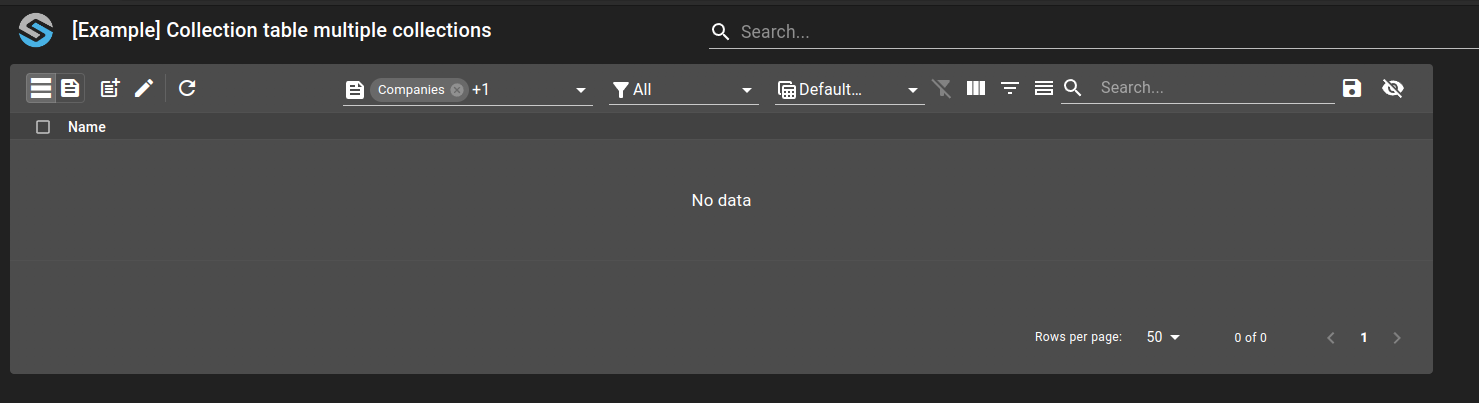
Which result in a dashboard like:
Create new entries
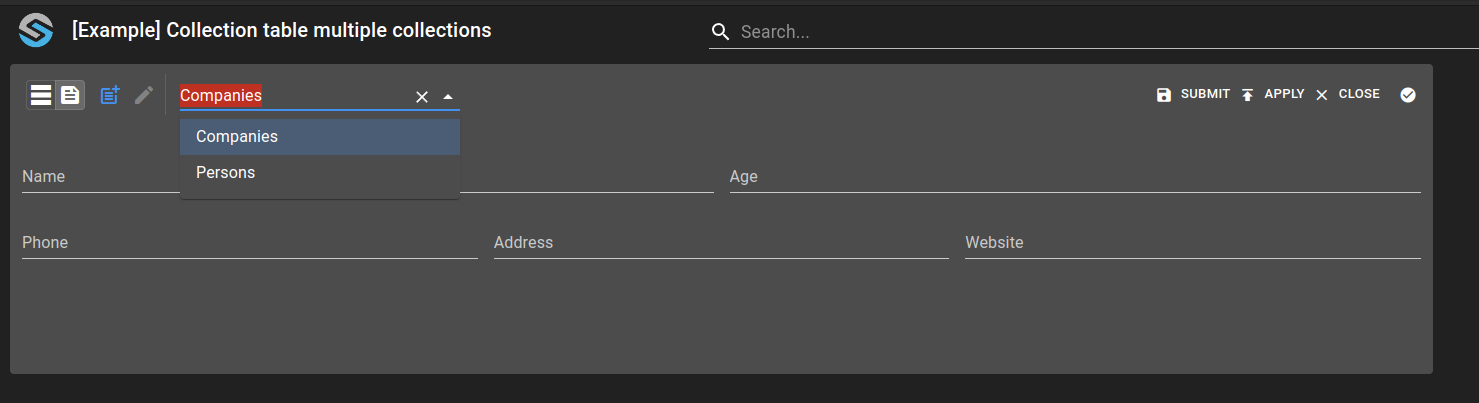
We can now attempt to create a new entry, for either one of the collections. When switching to the create view, we have the choice between the two forms we created. By choosing the Companies form, the new entry is inserted into the companies collections and, by choosing the other form, into the persons collection.
Visualize entries
Upon creating one company and two person, one of them without a phone number, we can see them in the display view.
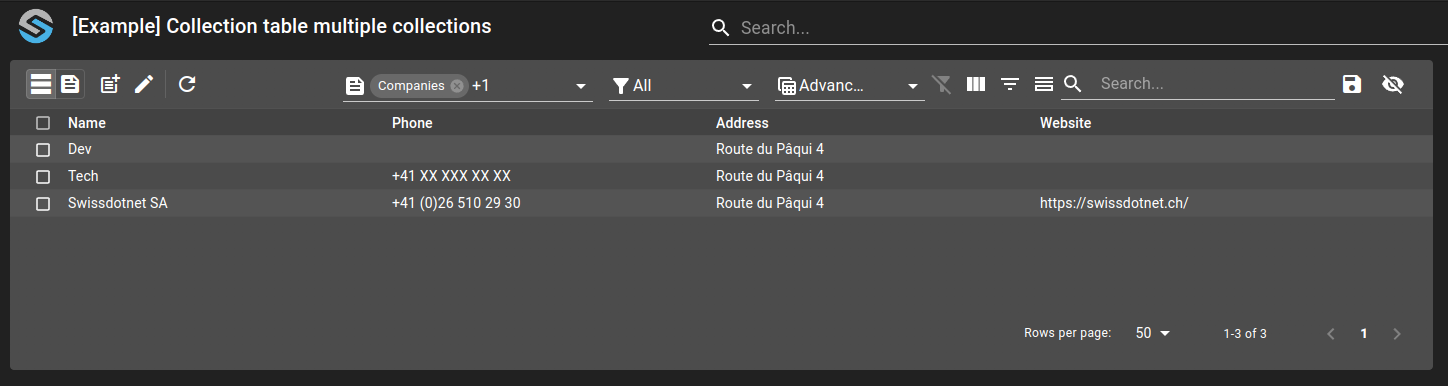
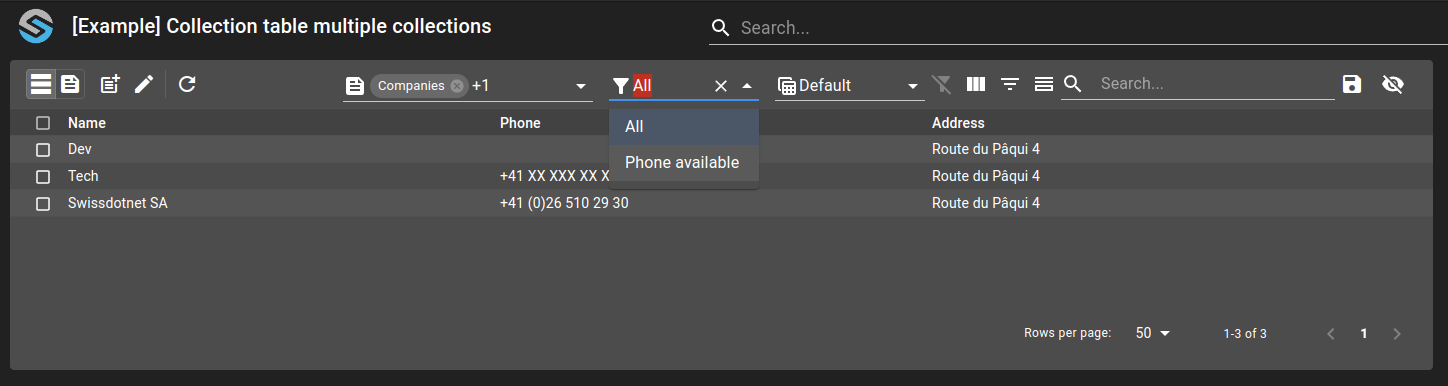
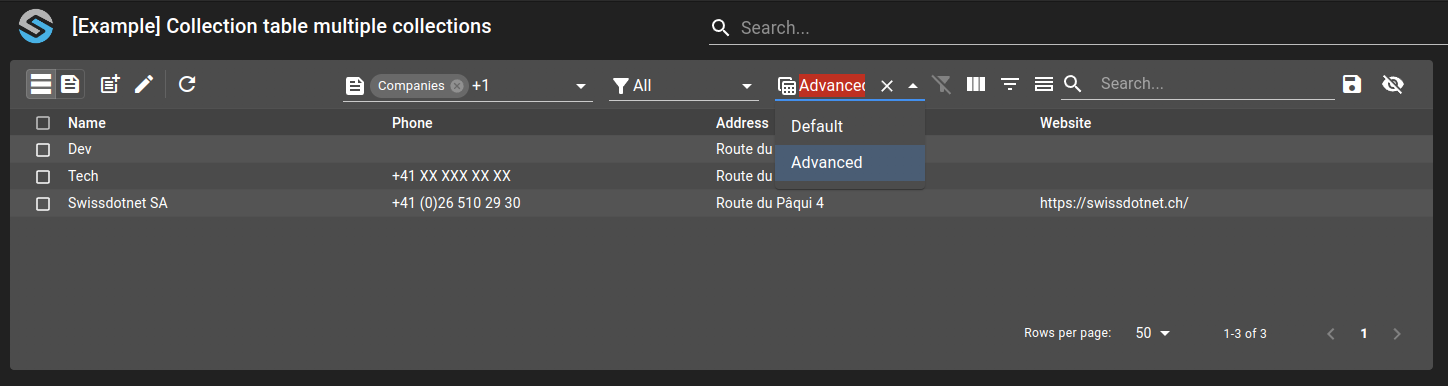
In the list of filters and views, we see only the filters and views shared, as we were expecting.