How to configure
OnSphere configuration is stored in a Git repository made available by the osp-configuration-dispatcher core-module. To reduce services downtime to a minimum, the osp-configuration-dispatcher uses one branch for the configuration currently running and another (the edit branch) for the configuration being edited. The edit branch is therefore the one you need to checkout and work on to interact with the OnSphere stack configuration. It does not mean you can not create other branches to work on (it is even recommended as it allows better granularity control on what is being modified) but once you are done, these changes will have to be pushed to this branch. When something is pushed on the edit branch, the osp-configuration-dispatcher checks the new configuration validity and either makes use of the new configuration or prevent the push when it detects errors.
OnSphere modularity means the whole stack does not have to be restarted every time a configuration change is made. Modules are only restarted when they are concerned by new configuration pushed on the edit branch. This behavior is offered by osp-configuration-dispatcher that handles per-module configuration processing.
OnSphere has some Core modules which are required for any OnSphere stack to properly work. Any module other than those four modules is called a plugin module which you can instantiate or not depending on your need, allowing you to only pay for what you need.
Note
To help you getting started with plugin modules default base configurations are provided. Those configurations are made available using Git branches. They are named osp-[MODULE]-configuration (e.g osp-modbus-configuration). The complete list can be found by calling :
$ git branch -a
in your OnSphere configuration directory. Once you have found the one you want to use, apply its content using :
$ git checkout origin/osp-[MODULE]-configuration -- .
The osp-configuration-dispatcher does the following for you:
Control the configuration validity.
Control field typing, field value validity, syntax, referencing, …
Only allow the deployment of a valid configuration.
Send the configuration to each module.
Git user
By default, git uses the user provided by Keycloak to access the configuration. A user needs to be a member of the group configuration to be able to retrieve and edit the configuration.
An osp user exists on the dispatcher allowing push even when the Keycloak module is down (error on the configuration or initial setup).
The password of this user is set by the secret admin-pwd.
It can be changed by adding a new secret and setting, on the module.service of the configuration dispatcher. The new secret has to be mapped to admin-pwd.
SSH keys can be configured for the user users.keycloak or define in a configuration mounted on /ssh/authorized_keys.
Fetch the configuration
The configuration can be updated using git. It can be cloned with the following command:
git clone ssh://{user}@{IP}:{PORT}/git/onsphere.git
where {user} is a user member of the administrator group, {IP} is the IP address of the machine on which the configuration dispatcher is running and {PORT} is the exported port (by default 5022) of the SSH service on any node of the swarm.
Setup git local path
During file validation, the server cannot determine the real path of the local git repository. To address this, we use push-options to send this information to the server. This is configured in the repository with the following command:
# Local (by repository)
git config --add push.pushOption osp-repo-path=/tmp/onsphere

# Global configuration
git config --global --add push.pushOption osp-repo-path=/tmp/onsphere
Accessing the configuration
Since under the hood the configuration is git-managed, to access it after the deployment of the stack you simply need to clone it as you would any other git repository :
git clone ssh://administrator@<your-stack-ip>:5022/git/onsphere.git
or
git clone ssh://osp@<your-stack-ip>:5022/git/onsphere.git
The password for the administrator user is onsphere by default. See osp-keycloak to modify it. The password for the osp user is defined by the <stack-name>-admin-pwd secret.
Edition of the configuration
In order to be able to properly run while still letting you edit the configuration, OnSphere uses a two branches system. Each branch has its purpose and characteristics:
“master”: is the branch representing the configuration currently used, it is protected and can only be written through merges
“edit”: is the branch you will edit when you want to modify the configuration. For it to be used, it needs to be merged into the “master” branch
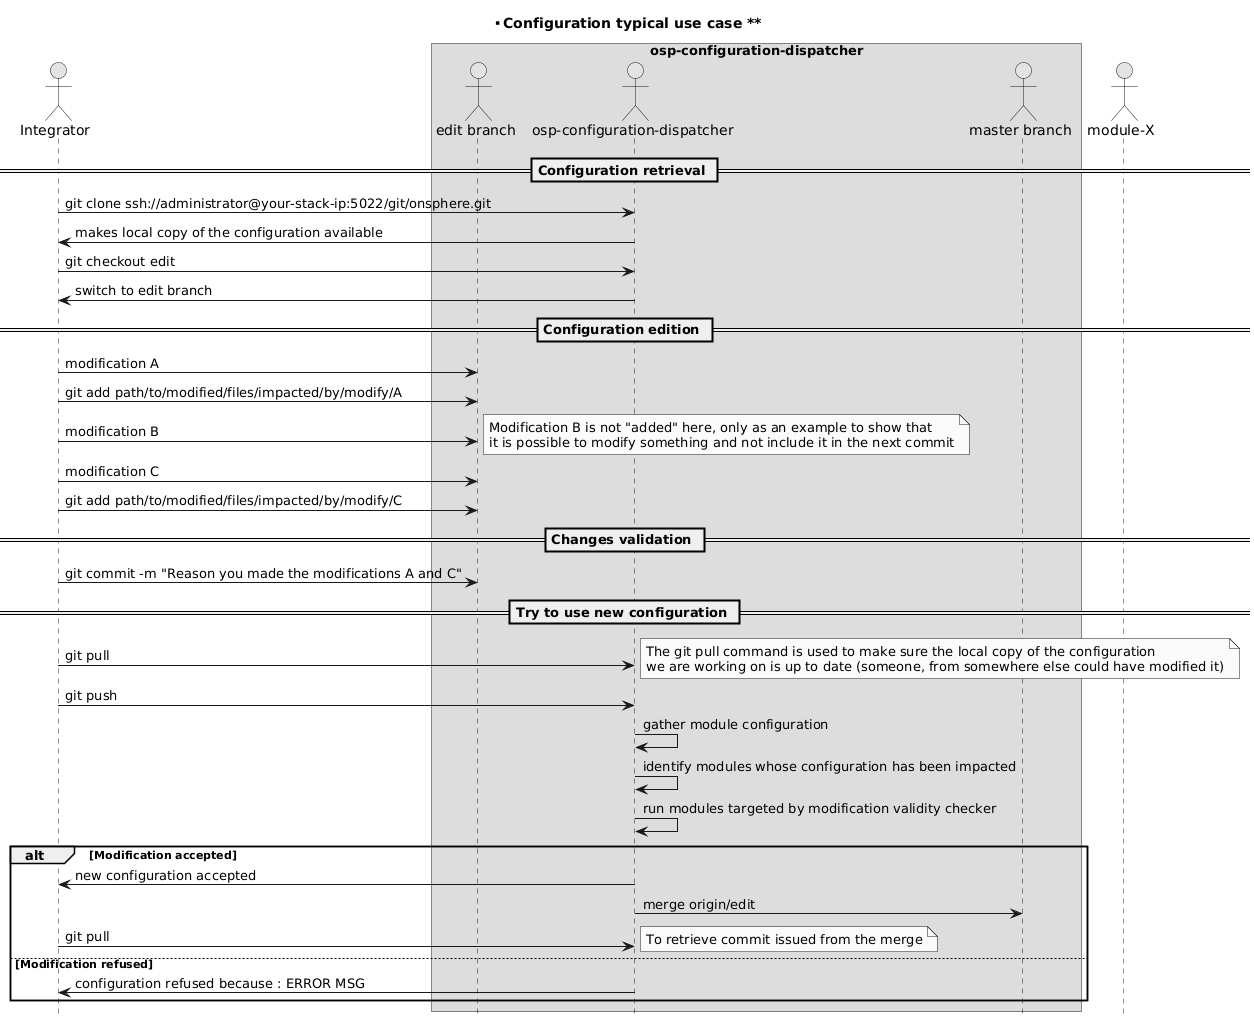
As you would for any git managed projects, once your modifications are done, you still need to add them to what is going to be part of the next commit using the git add command. e.g.:
git add path/to/file/impacted/by/modification
Once all modifications you want to be part of the next commit have been added, commit your changes with an appropriate message explaining why you made those changes, e.g.
git commit -m "Message explaining why you made those changes"
It is possible to make multiple modifications (therefore multiple commits) before requesting OnSphere to use the new configuration (which would reduce the number of module restart and therefore the associated services downtime).
After all modification you wanted to make are done (added and committed), you need to ask OnSphere to check the new configuration’s validity and if everything is OK, make use of the new configuration, e.g.:
git pull
git push
(the “git pull” command is called to make sure the local copy of the configuration you are working on is up to date)
The osp-configuration-dispatcher will then identify modules impacted by the modifications and run their “validity checker” (each module has its own binary used to verify the configuration complies with its requirements) to make sure the new configuration can be used. If everything is OK the osp-configuration-dispatcher will accept the new configuration and use it, otherwise it will return an error message explaining why the changes were refused.
A typical use case would look like this :